Tis the season….for Graduations!

mondaymontage banner revised Oct 13

Monday Montage Blog Hop – Week 20

Hello friends! Welcome back to our Monday Montage Blog Hop! You may have gotten here from the amazing Bree Renwick’s blog, make sure you select the “next” button below and that will take you to the next stop on the hop, the fabulous Dara Gloden’s blog. I have something super fun today & I know my friends have amazing inspiration too!

I had to make something a little outside the box for graduation.  I love, love, love the new Traveler stamp set and I had to make something with the globe!  I also used the new Something to Say stamp set for the sentiment.  These two sets go together like peas & carrots for graduation!

The other new product that I used that I am over the moon for are the Blendabilities Markers!  These aren’t available for purchase yet so if you have to have them you just might want to consider signing up!  It’s going to be only $50 to sign up starting tomorrow for a very limited time!  Really!  I used the markers to color the globe and the rhinestones!  Aren’t those rhinestones gorgeous??????  I cannot get enough of this technique.

photo 1 mm


photo 2 mm

I hope you enjoyed this project I made to celebrate all the graduates this month!

Don’t miss the rest of the pretties my friends have for you!  I just know everyone has gorgeous projects to share!

Make sure you go “Back” if you missed Bree Renwick or you can loop on around by hitting the “Next” button to get to Dara Gloden and the rest of the hop!

At the bottom of my post you can find the products I used, just click on the picture to order!

mondaymontagebackrev

mondaymontagenext

Happy, Happy Mother’s Day!

mondaymontage banner revised Oct 13

Monday Montage Blog Hop – Week 19

Hello friends! Welcome back to our Monday Montage Blog Hop! You may have gotten here from the amazing Bree Renwick’s blog, make sure you select the “next” button below and that will take you to the next stop on the hop, the fabulous Dani Dziama’s blog. I have something super fun today & I know my friends have amazing inspiration too!

I just had to use a couple of our new products coming in the new catalog in a few short weeks and some stuff that that will soon be gone from the Occasions Catalog!  I also used some of my April Paper Pumpkin goodies & I was totally inspired by that project.  If you are not subscribing to My Paper Pumpkin, you are totally missing out!  The projects are so super, duper cute and the stamps sets are only available to subscribers.  I have to say, the stamps that come with MPP are some of my “go to” stamps!  Sooooo adorbs!

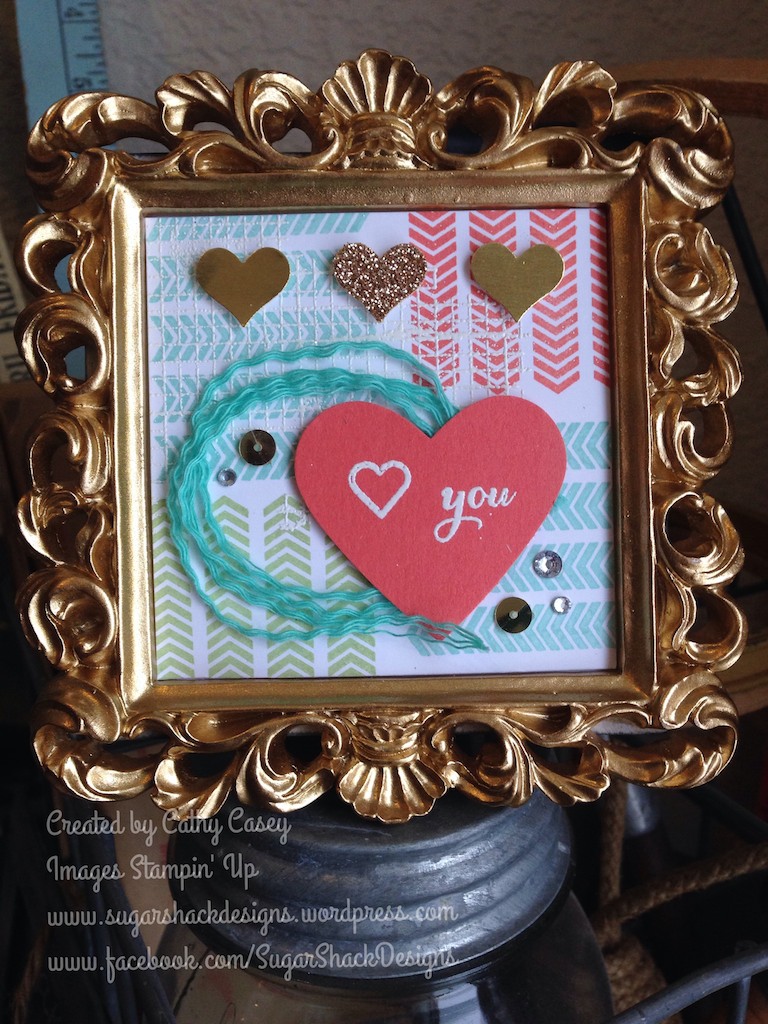
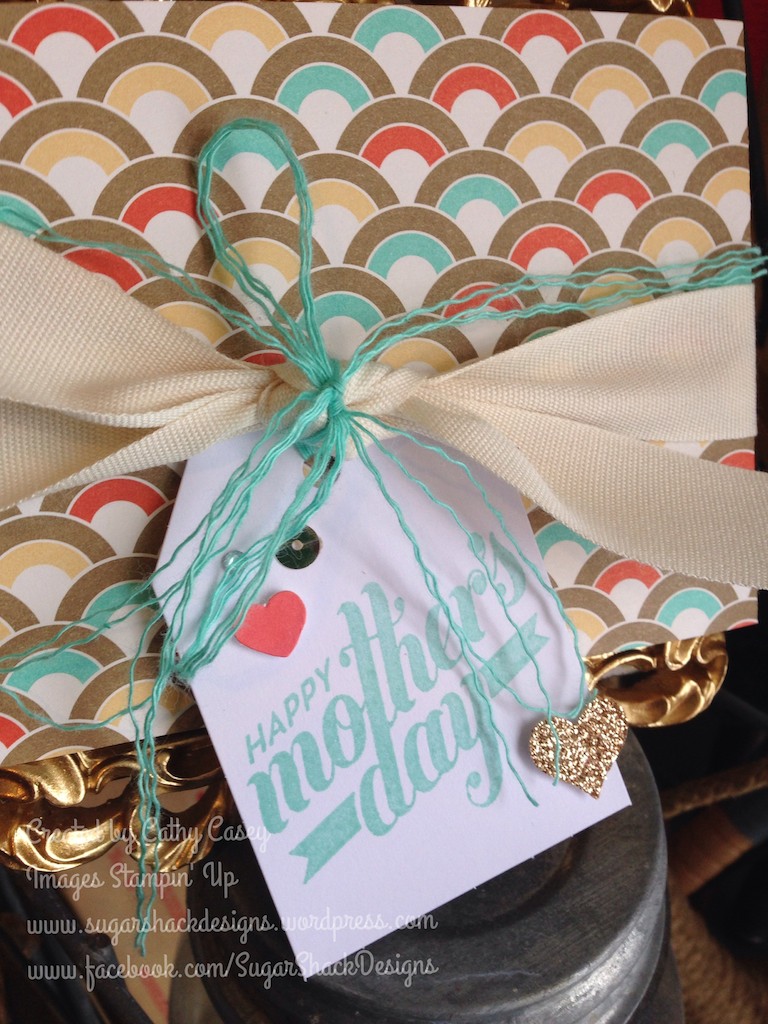
MPP came with a beautiful white 4″ x 4″ frame and some pre-cut pre scored card stock to make a cute “wrap” around the finished frame.  I wanted to show that you can duplicate this project with any frame you pick up at any craft store.  I got my beautiful gold frame at Michael’s in the dollar bins.  I think I paid $2 for it but it is so pretty and well worth the $2 🙂

Cathy 005 (2)

Cathy 006 (2)

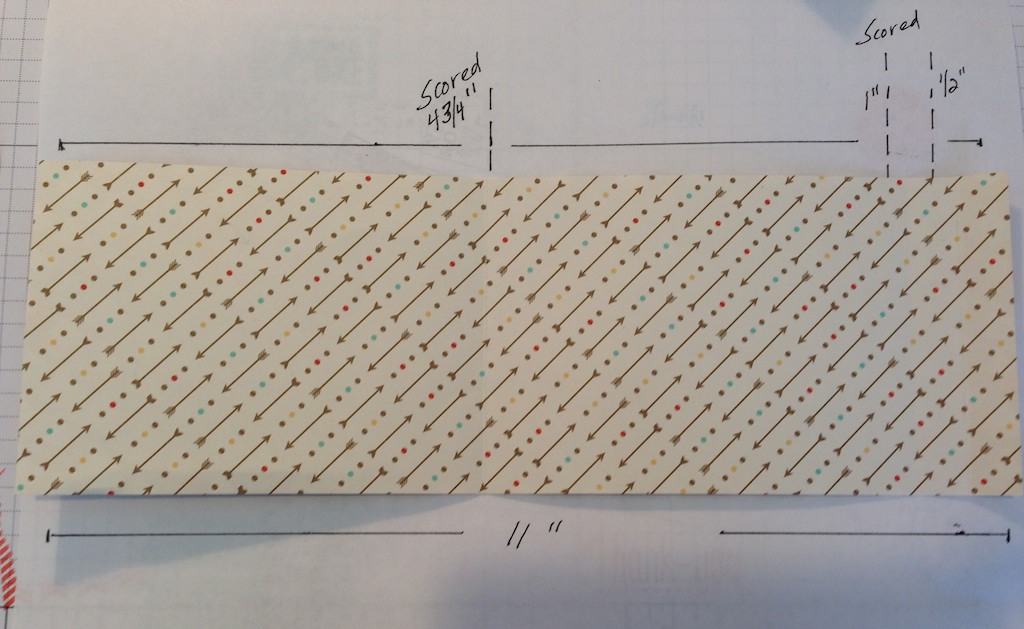
Let’s talk about how I made the outer wrap first.  I had to modify the dimensions of the wrap piece to match my frame.  The MPP project has the top and bottom of the frame sticking out and I loved that look…my gold frame sticking out top and bottom is just delish!

Cathy 007 (2)

Cathy 008 (1)

Here are the measurements I used:

The narrow dimension was 3.5″ to fit my frame and leave some of the gold edges visible top and bottom.  The long dimension was 11″, that gave me a front of 4.75″, a back of 4.75″ and 1.5″ to score and fold for the ends.  See the dimensions below:

Cathy 004 (2)

You just need to adapt to whatever your size frame is, your folds are based on the thickness and the big sections are based on the front dimensions.  Really easy I promise!

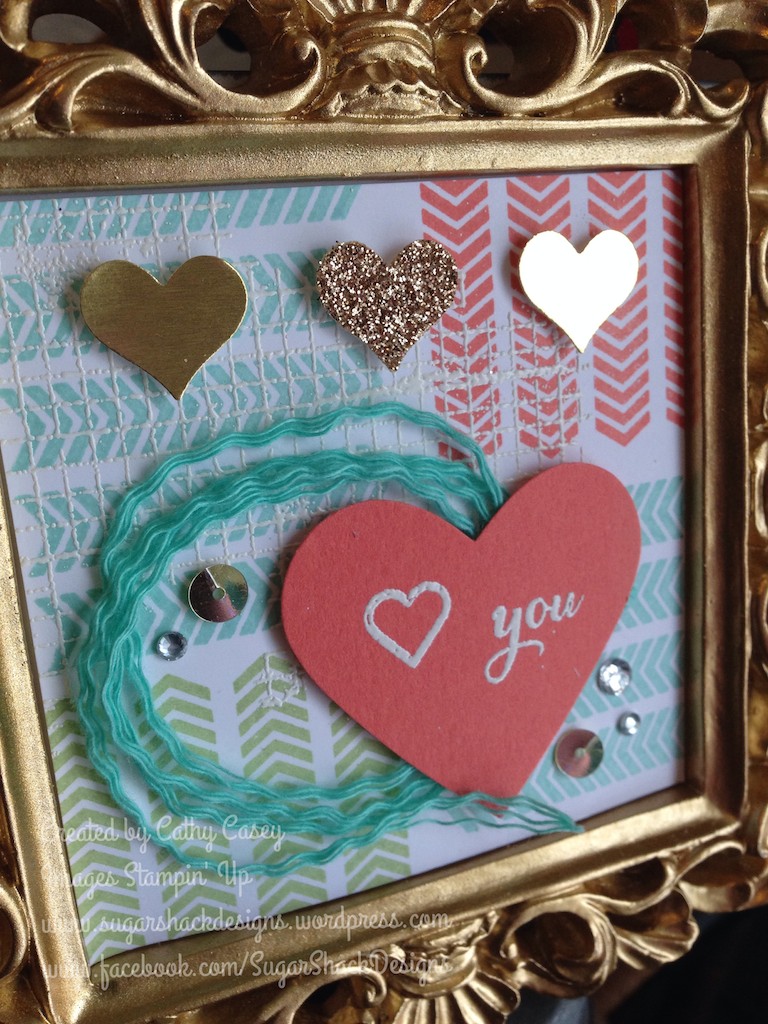
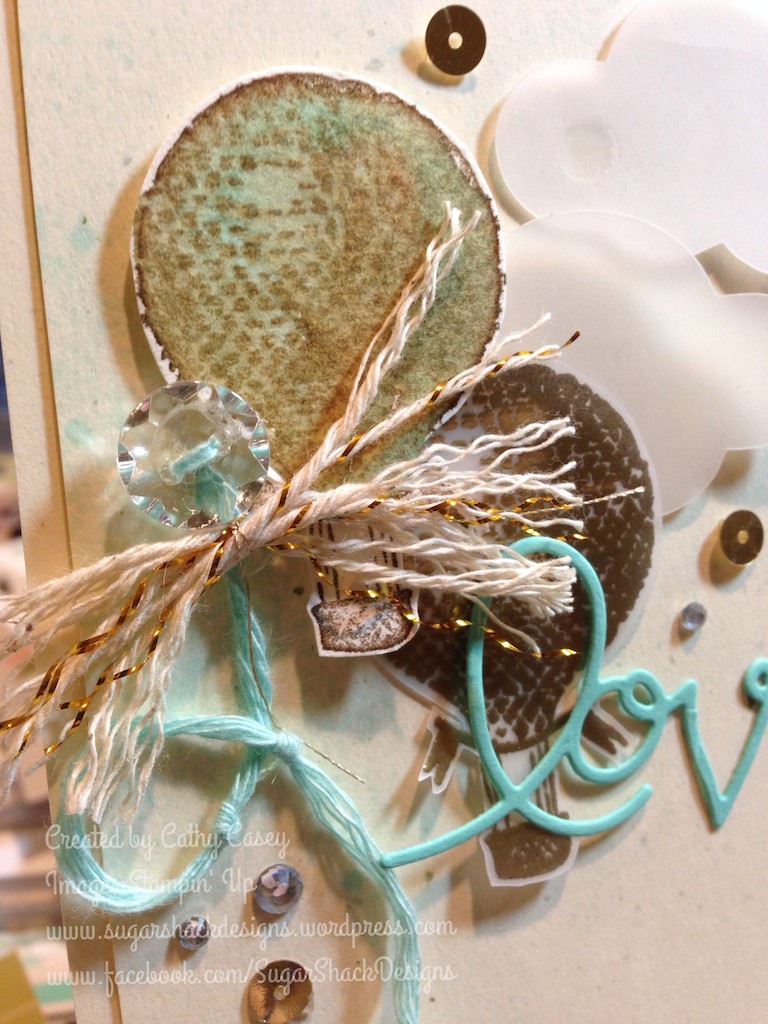
Since my frame was gold, I had to add lots of gold accents, hearts punched out of gold foil and gold glitter paper.  Isn’t that new little heart punch the cutest?  I just love the look of that heart!  I also added gold sequins and rhinestones.  I can hardly wait to order the new sequins in the new catalog!  They are soooo cutely!  If you don’t have a new catalog yet, let me know and I will get one right out to you!

I was also super excited to see that the thick baker’s twine we had during Sale-A-Bration made the catalog!  I just love that stuff!  I un-twine it and it makes the best fluffy twine ever.  I used Coastal Cabana for my front bow and my twine inside on the frame.  I used the MPP stamps to do my background and my front tag.  MPP stamps are photopolymer now.  I really, really like using photopolymer stamps.  It is easy, peasy to get them lined up right where you want them and they stick to the blocks like crazy!  Another stamp set I just had to use was “Off the Grid”.  I am so, so, so sad that set is retiring!  I have used it so much this past year, I just think it is the perfect add to nearly everything!  I stamped it in Versamark on top of my arrows in the background and embossed it in white.  I just love how that looks!

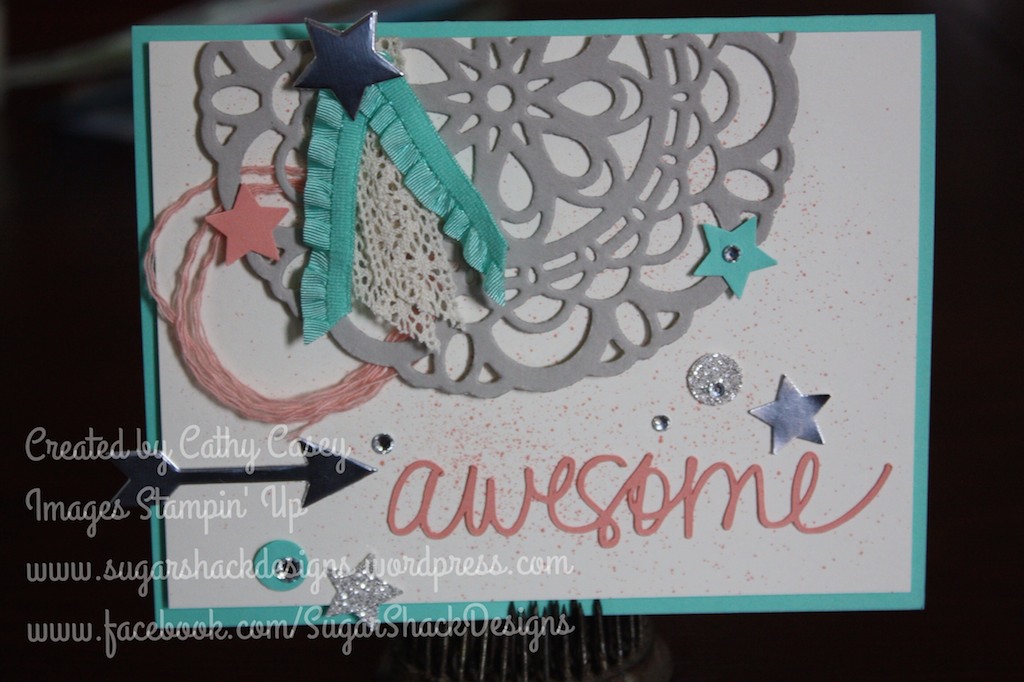
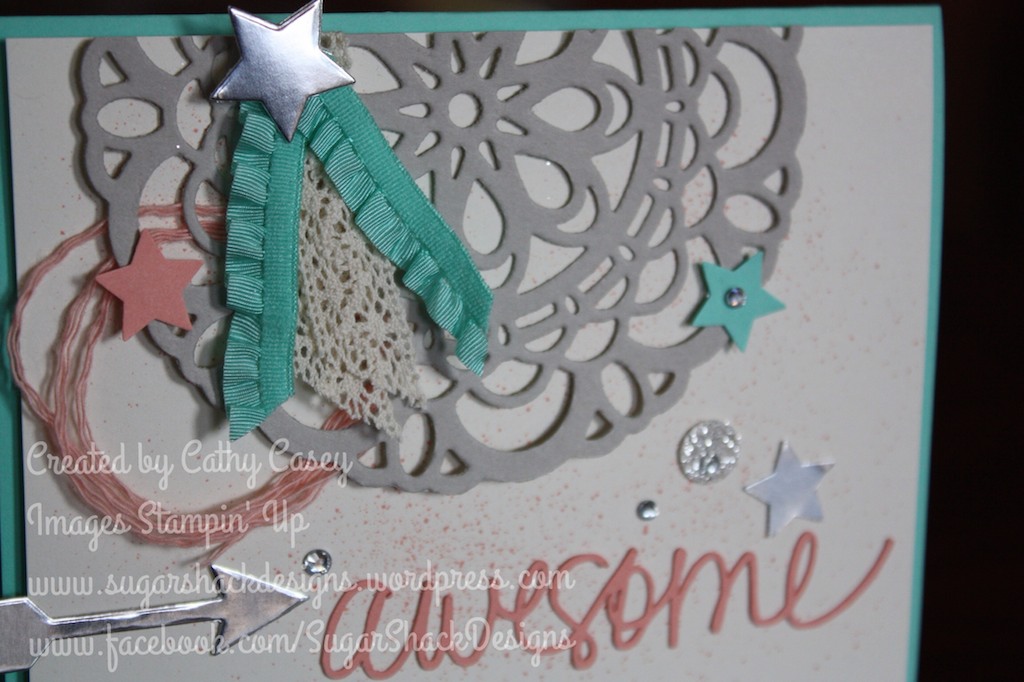
That’s pretty much it, I used a few new items, a few MPP items and a few soon to be gone items!  I also used the MPP inspiration to make a similar project with other supplies (the frame).  Lots of things to inspire you to look outside the box so to speak!

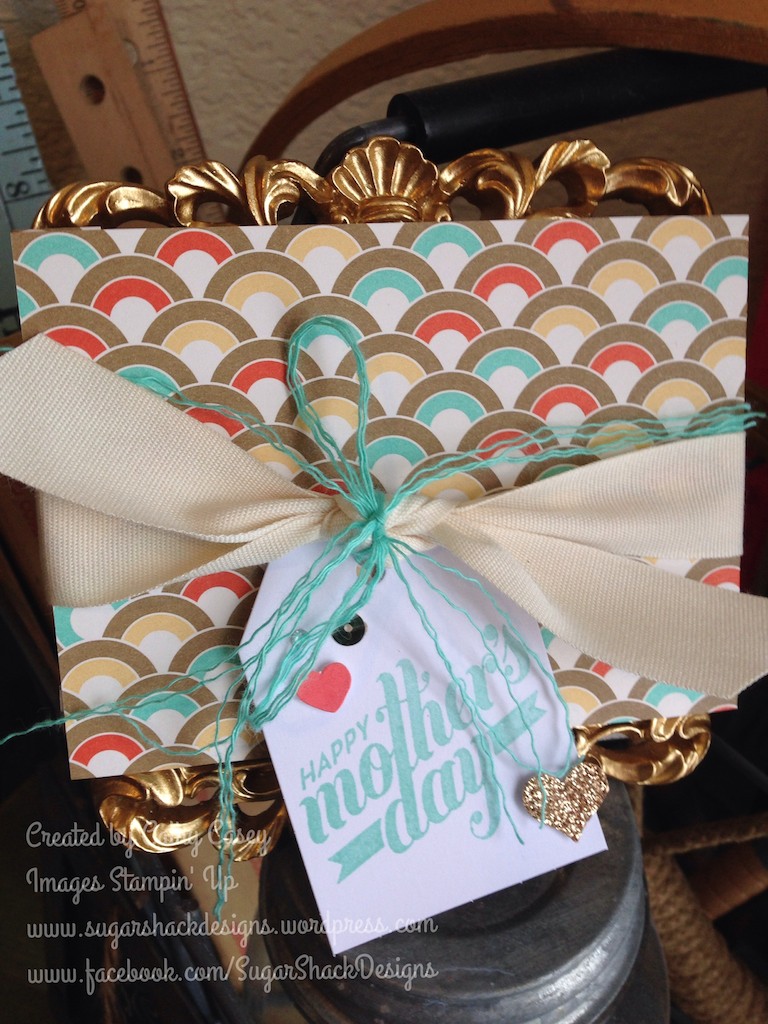
I hope you enjoyed this project I made for my mom for Mother’s Day & that I’ve inspired you to use MPP as a jumping off place for your creativity 🙂

Don’t miss the rest of the pretties my friends have for you!  I just know everyone has gorgeous projects to share!

Make sure you go “Back” if you missed Bree Renwick or you can loop on around by hitting the “Next” button to get to Dani Dziama and the rest of the hop!

At the bottom of my post you can find the products I used, just click on the picture to order!

mondaymontagebackrev

mondaymontagenext

Springtime Fun!

mondaymontage banner revised Oct 13

Monday Montage Blog Hop – Week 18

Hello friends! Welcome back to our Monday Montage Blog Hop! You may have gotten here from the amazing Bree Renwick’s blog, make sure you select the “next” button below and that will take you to the next stop on the hop, the fabulous Dani Dziama’s blog. I have something fun today & I know my friends have amazing inspiration too!

I wanted to make something with the Springtime Garland Simply Created Kit and I kinda wanted to make some cards instead of the garland.  I have LOT’s of parts left though and can definitely make some more cards and a garland 🙂  I have made bunches of projects lately and I really wanted to play with my favorite retiring products to showcase those before they are gone but they are seriously selling out so quickly that I hardly have time to post a project before all the parts are gone!  Soooo I just decided to play with something that is still current 🙂

On both cards I cut some of the cute banner stickers in half, these were fast and easy to use and added lots of interest to my projects.  On this first card I also used the Spiral Flower Die which gave me an over the top Spring look!

Cathy 005 (1)

Cathy 006 (1)

The second card features more pieces from the kit and I stitched the circle pieces to one of the banners, I love how this came out.

Cathy 007 (1)

Cathy 008

I hope you enjoyed these fast & easy projects as much as I enjoyed making them to share!  There are so many goodies in this Simply Created Kit that you could knock out several quick cards without very much work on your part!

Don’t miss the rest of the pretties my friends have for you!  I just know everyone has gorgeous projects to share!

Make sure you go “Back” if you missed Bree Renwick or you can loop on around by hitting the “Next” button to get to Dani Dziama and the rest of the hop!

mondaymontagebackrev

mondaymontagenext

My sweet girls…

I love this picture of my daughter and her dog Sawyer when Sawyer was just a little puppy that I have scrapped it into a traditional page and now a digital layout.  This project was quick and easy….so much faster and more portable than traditional scrapping!

I used the beautiful SVG “lovely” from Endless Birthday Wishes…gosh I just love the word brushes in that set!  I also used the new “Gorgeous Grunge” brushes, I love that stamp set so much and I am thrilled its available in digital form now!

Marissa-Sawyer Digi Scrap

I hope you are having a fantastic Sunday and find a few minutes to do something you love!

You can find all the fun things I used below, click on the picture to go to my online store to purchase!

beautiful butterflies

I’ve been obsessed with butterflies the last few weeks….crafted butterflies anyway!  I pulled out a couple of things I haven’t used in a while:  the Papillon Potpourri stamp set and the Beautiful Wings embosslit.  And look how beautiful they are!  I tried a couple of techniques on this card.  I love how it came out but I have to say, I probably won’t do at least one of these techniques in quite the same way again!

Beautiful Butterflies 1

The first thing I did was use my Hive framelit as a stencil for Gesso.  I slathered Gesso into some, not all of the openings.  I dried the Gesso with my heat gun and then I painted the gessoed octagons with gold encore ink.  The part I would not do again is use the framelit as a stencil!  I cannot get all the dried Gesso off!  Next time, I will make a paper stencil first…much better plan 🙂  I love the look though, very pretty tone on tone look on the Whisper White with a hint of gold sparkle.

Next I added a folded doily on the right side and spritzed the whole card front with Tempting Turquoise re-inker mixed with alcohol.  I slid the fat white banner underneath the spritzed doily and added a sliver of plain white doily underneath the banner on the other side.  I love how this looked!  The spritzed doily is really set off by the plain white banner underneath it.  Tiny little “thanks” sentiment on the bottom of the banner stamped in Tempting Turquoise.

I stamped one of the butterflies from Papillon Potpourri in Versamark on vellum paper.  Then I heat embossed it in gold and punched it out with the butterfly punch.  I made his little feelers out of fluffed up Gold Baker’s Twine and added a huge fluffy baker’s twine accent underneath.  The rest of the butterflies are out of Gold Foil and Whisper White cut with the Beautiful Wings embosslit.  A few rhinestones and sequins finished the card.

I wish you could see how pretty this is in person!  Yummy!  I still love, love gold in all its forms and seem to have to include it on nearly everything I make lately!

Cathy 005


It’s been a long week.  My daughter had surgery on Monday and I just haven’t had a chance to create much this week.  I needed some creative downtime though and this project soothed my soul today.

I hope this inspires you to make something pretty!

You can find all the fun things I used below, click on the picture to go to my online store to purchase!

all about love

mondaymontage banner revised Oct 13

Monday Montage Blog Hop – Week 17

Hello friends! Welcome back to our Monday Montage Blog Hop! You may have gotten here from the amazing Bree Renwick’s blog, make sure you select the “next” button below and that will take you to the next stop on the hop, the fabulous Dani Dziama’s blog. I have something funky & fresh today & I know my friends have amazing inspiration too!

Today’s card was inspired by something I saw on Pinterest, I can’t remember exactly what but when I find it again, I’ll give credit where credit is due!  I pulled out one of my fave sets that hasn’t seen ink in a while during a virtual craft night with my friends.  I just love, love, love that balloon image!!!!  With my luck it will be on the retired list, you’ll probably be seeing a bunch more of it from me if it ends up on there!

I used my e-cutter to cut the clouds out of vellum and I embossed the balloon in gold embossing powder on vellum for one image.  The second balloon I stamped on watercolor paper in Soft Suede and then I watercolored it with Coastal Cabana.  I cut the love out of Coastal Cabana with the Expressions Framelit.  I used Naturals Ivory as my base and I spritzed it lightly  with Coastal Cabana re-inker and alcohol mixed.

Cathy 004 (5)

Cathy 005 (5)

I added some cute rhinestones, a button, baker’s twine and sequins to finish off the look!  So easy and pretty 🙂

 I hope you enjoyed this project as much as I enjoyed making it to share!

Don’t miss the rest of the pretties my   friends have for you!  I just know everyone has gorgeous projects to share!

Make sure you go “Back” if you missed Bree Renwick or you can loop on around by hitting the “Next” button to get to Dani Dziama and the rest of the hop!

mondaymontagebackrev

mondaymontagenext

Star Studded Project!

This cute and fast little card features one of my absolutely favorite My Paper Pumpkin sets.  Are you subscribed to My Paper Pumpkin?  If you aren’t, you are missing out!  I have to say the limited edition stamp sets that come in the My Paper Pumpkin kits are always my favorites, very trendy and so much fun to use!  Go to MyPaperPumpkin.com to sign up for a monthly craft project in a box, always sure to be a fun craft getaway right at your kitchen table!

Okay, back to this cute card!  It was so fast and easy to put together!  I punched a couple of stars and some fun label shapes with the Little Labels Punch Pack.  I cut a piece of Retro Fresh Designer Series Paper in a fun angled shape, layered that with half a strip of Chevron Ribbon and then stacked the stars and label punches on top of that with some twine.  I love the way the quick hit of Cherry Cobbler in one of the labels sets off the whole card.  Quick banner sentiments stamped with the Paper Pumpkin images and some rhinestones….yummy!  I think the whole thing came together in about 8 minutes!


Cathy 005 (4)


Cathy 004 (4)

Did this make you want to make something fast and fun?  I sure hope so!  I would love to see your star studded project!

You can find all the fun things I used below, click on the picture to go to my online store to purchase!

Awesome!

This is one AWESOME card, perfect for an AWESOME friend!  There are lots of fun goodies on this card.  I used my Silhouette Cameo to cut the “awesome” out in Crisp Cantaloupe…isn’t that fun?  I was going to say “awesome” again, but enough already!  I used my Paper Doily Sizzlets to cut out the big doily in Sahara Sand Cardstock.  I don’t use this die enough because it is always seems like so much work to pop all the paper pieces out.  I have a little trick for this die though….sandwich wax paper between the die and your card stock and your die cut paper shape will slip out like buttah!!!

The rest of the little details on this card were fun and easy.  I spritzed the base with Crisp Cantaloupe re-inker mixed with alcohol.  I punched some stars out in Coastal Cabana, Silver Foil, Silver Glitter and Crisp Cantaloupe.  I die cut the arrow out of Silver Foil, added some rhinestones and ribbon and the whole thing came together beautifully!

Cathy 006 (1)

Cathy 005 (2)

Cathy 004 (3)

I hope you enjoy this card today and it inspires you to make your own fun project!  I just love how all of these goodies came together to make such a cute card!

You can find all the fun things I used below, click on the picture to go to my online store to purchase!

So simple, so fun!

This is a super fun and fast card!  It would be easy to make this one with a couple different color combos and sentiments to stock up for special occasions 🙂

I used the Starburst Framelits and the Starburst Sayings stamp set.  I popped a few quick layers together mixing and matching paper that went with the DSP I used, in this case Kaleidoscope which features lots of fun, bright colors.  I also mixed in some circle die cuts with the starburst die cuts for interest.  I stamped the “world” section of the stamp again in Strawberry Slush and cut the little banner out and popped it up on top.  Finishing touches were a button and some rhinestones.  So fast and easy!

Cathy 022

Cathy 023


I hope you enjoyed this card today and it inspired you to make your own fun project!  I think this one has lots of punch for a quick card!

You can find the cute things I used below, click on the picture to go to my online store to purchase!

You make me happy when skies are gray…

You’ll never know how much I love you….please don’t take my sunshine away!

Such a cute song and what a cute stamp!  AND another Sale-A-Bration stamp set that is one of my faves!  I wanted to use the stamp and the Sale-A-Bration twine for this card and as soon as I made that decision, the card whipped together in no time!

I have been using the Pool Party Twine and the Crisp Cantaloupe Twine lots but I had not yet used the Summer Starfruit so I just had to use it too!  This card is so simple, a few cute layers and embellishments and voila!  A sweet card for a sweet friend or family member!  I also used the Starburst Framelits which I must say, I cannot get enough of!  I want to use them for everything!

Cathy 018

Cathy 019

I hope this quick and easy card has made you happy when skies are gray!  We still seem to be having rough weather in some parts of the country this week!  Take advantage of the stormy weather to craft your heart out!

You can find the cute things I used below, click on the picture to go to my online store to purchase!  Remember, Sale-A-Bration ends at midnight MST on March 31st….only a little time left to shop!