Succulents for Mama

I’m traveling this week for a Stampin’ Up event in Savannah, Georgia.  My first stop is my bestie’s in Pensacola, Florida.  We were stamping crazies the first 24 hours after I arrived!  Both of us are Display Stampers for the event and had a pile of projects to create for the display boards in Savannah.  Typical pro-craft-ination waiting till the last few days to finish all our projects!  I’m glad we had required stamping to do…we had so much fun in our whirlwind of creativity, it is the very best getting to stamp together in IRL instead of crafting together virtually across the country!  I can’t wait to share what I made for the boards, you can come back here to see my projects as soon as it’s okay to post them 🙂

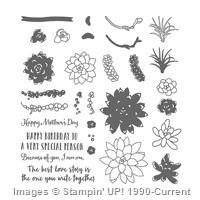
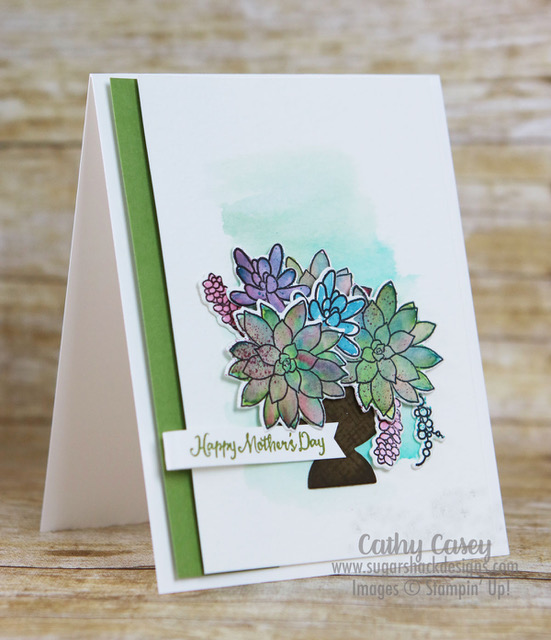
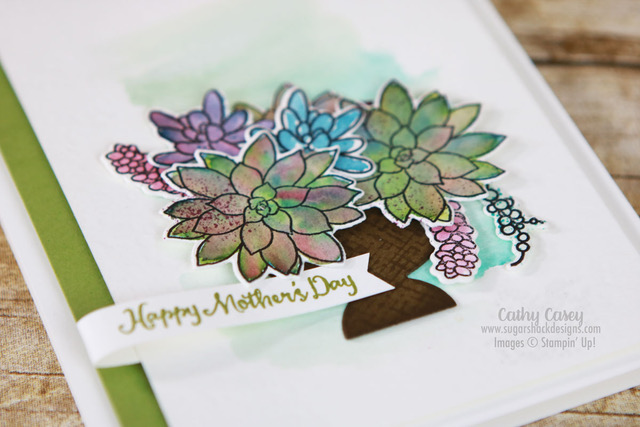
You might think I would have needed a rest from stamping for the displays but I couldn’t wait to play with some of the sets in this stamp room that are not in my own lol!  I finally got to play with the Oh So Succulent stamp set and I am in love with the results!  The possibilities for watercoloring with this set makes my heart go pitter-pat 🙂  There are so many fun images and details in the set and you can color the line images like I did or you can use it for two-step stamping and fill in the line images with the second stamp.  This makes this set exceptionally versatile for whatever kind of stamping you feel like doing.

Oh So Succulent Stampin' Up

Oh So Succulent Stampin' Up

Creative Tips:

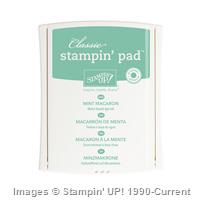
  1.  I played with my colors on a scrap of watercolor paper before committing to each plant image.  When I had a combination I liked, I watercolored one of the plants.  Inks I played with for this card include:  Sweet Sugarplum, Island Indigo, Mint Macaron, Old Olive, Bermuda Bay and Rich Razzleberry.
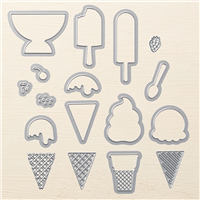
  2. Isn’t the little planter the cutest?  Can you guess where it came from?  It’s the ice cream bowl from the Frozen Treats die set!
  3. I am obsessed with watercolor washes in the background of my card fronts.  I think that sweet wash of color makes the main images pop.  On this card I used Mint Macaron and Bermuda Bay in my wash.

Oh So Succulent Stampin' Up

Stay tuned for more stamping fun over the next two weeks!  I can’t wait to share crafting and traveling fun with you 🙂


Happy, Happy Mother’s Day!

mondaymontage banner revised Oct 13

Monday Montage Blog Hop – Week 19

Hello friends! Welcome back to our Monday Montage Blog Hop! You may have gotten here from the amazing Bree Renwick’s blog, make sure you select the “next” button below and that will take you to the next stop on the hop, the fabulous Dani Dziama’s blog. I have something super fun today & I know my friends have amazing inspiration too!

I just had to use a couple of our new products coming in the new catalog in a few short weeks and some stuff that that will soon be gone from the Occasions Catalog!  I also used some of my April Paper Pumpkin goodies & I was totally inspired by that project.  If you are not subscribing to My Paper Pumpkin, you are totally missing out!  The projects are so super, duper cute and the stamps sets are only available to subscribers.  I have to say, the stamps that come with MPP are some of my “go to” stamps!  Sooooo adorbs!

MPP came with a beautiful white 4″ x 4″ frame and some pre-cut pre scored card stock to make a cute “wrap” around the finished frame.  I wanted to show that you can duplicate this project with any frame you pick up at any craft store.  I got my beautiful gold frame at Michael’s in the dollar bins.  I think I paid $2 for it but it is so pretty and well worth the $2 🙂

Cathy 005 (2)

Cathy 006 (2)

Let’s talk about how I made the outer wrap first.  I had to modify the dimensions of the wrap piece to match my frame.  The MPP project has the top and bottom of the frame sticking out and I loved that look…my gold frame sticking out top and bottom is just delish!

Cathy 007 (2)

Cathy 008 (1)

Here are the measurements I used:

The narrow dimension was 3.5″ to fit my frame and leave some of the gold edges visible top and bottom.  The long dimension was 11″, that gave me a front of 4.75″, a back of 4.75″ and 1.5″ to score and fold for the ends.  See the dimensions below:

Cathy 004 (2)

You just need to adapt to whatever your size frame is, your folds are based on the thickness and the big sections are based on the front dimensions.  Really easy I promise!

Since my frame was gold, I had to add lots of gold accents, hearts punched out of gold foil and gold glitter paper.  Isn’t that new little heart punch the cutest?  I just love the look of that heart!  I also added gold sequins and rhinestones.  I can hardly wait to order the new sequins in the new catalog!  They are soooo cutely!  If you don’t have a new catalog yet, let me know and I will get one right out to you!

I was also super excited to see that the thick baker’s twine we had during Sale-A-Bration made the catalog!  I just love that stuff!  I un-twine it and it makes the best fluffy twine ever.  I used Coastal Cabana for my front bow and my twine inside on the frame.  I used the MPP stamps to do my background and my front tag.  MPP stamps are photopolymer now.  I really, really like using photopolymer stamps.  It is easy, peasy to get them lined up right where you want them and they stick to the blocks like crazy!  Another stamp set I just had to use was “Off the Grid”.  I am so, so, so sad that set is retiring!  I have used it so much this past year, I just think it is the perfect add to nearly everything!  I stamped it in Versamark on top of my arrows in the background and embossed it in white.  I just love how that looks!

That’s pretty much it, I used a few new items, a few MPP items and a few soon to be gone items!  I also used the MPP inspiration to make a similar project with other supplies (the frame).  Lots of things to inspire you to look outside the box so to speak!

I hope you enjoyed this project I made for my mom for Mother’s Day & that I’ve inspired you to use MPP as a jumping off place for your creativity 🙂

Don’t miss the rest of the pretties my friends have for you!  I just know everyone has gorgeous projects to share!

Make sure you go “Back” if you missed Bree Renwick or you can loop on around by hitting the “Next” button to get to Dani Dziama and the rest of the hop!

At the bottom of my post you can find the products I used, just click on the picture to order!

mondaymontagebackrev

mondaymontagenext

more Artisan Embellishments Kit inspiration!

Artisan Bonus - Blog

Good morning friends!  This is the bonus card I designed for the Artisan Class.  Again, using embellishments from the Artisan Embellishment Kit and Tea for Two Designer Series Paper.  I also used Vellum Card Stock, the Papillon Potpourri Stamp Set and the Bitty Butterfly Punch.  This card was quick, elegant and makes a nice thank you or Mother’s Day card.

I have been on vacation in Virginia at my bestie’s house and we have been creating up a storm!  Stay tuned for some seriously gorgeous inspiration!

To purchase these products go to my online store!

Check here for upcoming events and classes!

Artisan Embellishments Kit….swoon-a-liscious!

Artisan Box - Blog Pic

A few weeks ago I co-hosted a fun class based on the fantastic Artisan Embellishments Kit in the Stampin’ Up Spring Mini Catalog.  One of the projects I designed for the class is this beautiful box with three 3×3 cards/envies inside.

The box is made with the Fancy Favor Die out of Very Vanilla card stock.  I used one stamp set (Oh, Hello), two Designer Series Papers (Tea for Two & First Edition) and nearly every other element came from the Artisan Embellishments Kit!  I can’t seem to get enough of this beautiful kit, the ribbon & lace are luscious and the buttons….oh my!  and the flowers….well you get the idea!  Just makes me swoon!

Card 3 - Artisan - Blog

Card 1

Card 2 - Artisan - Blog

Card 2

Card 1 - Artisan - Blog

Card 3

The finished box and cards are a lovely gift for someone special (Mother’s Day is coming up soon!) or you can treat yourself with this little goody 🙂  The best part is that you will still have a lot of fun pieces left in your Artisan Embellishment Kit after making these projects to make more pretty things with!

I hope you are having a fantastic day and finding some time to make something pretty!

To purchase these products go to my online store!

Check here for upcoming events and classes!