2013 Artisan Finalists Blog Hop – Day 2

2013artisanfinalistA

Welcome to Day 2 of the 2013 Artisan Design Team Finalists Blog Hop!  You should have come from the fabulous Bree Renwick’s post to get here and from here you can click on “next” and get to Dani Dziama’s amazing work!  If you missed Bree either select the “back” button to get there or go all the way around the hop to get back to her.

IMG_4211

IMG_4213

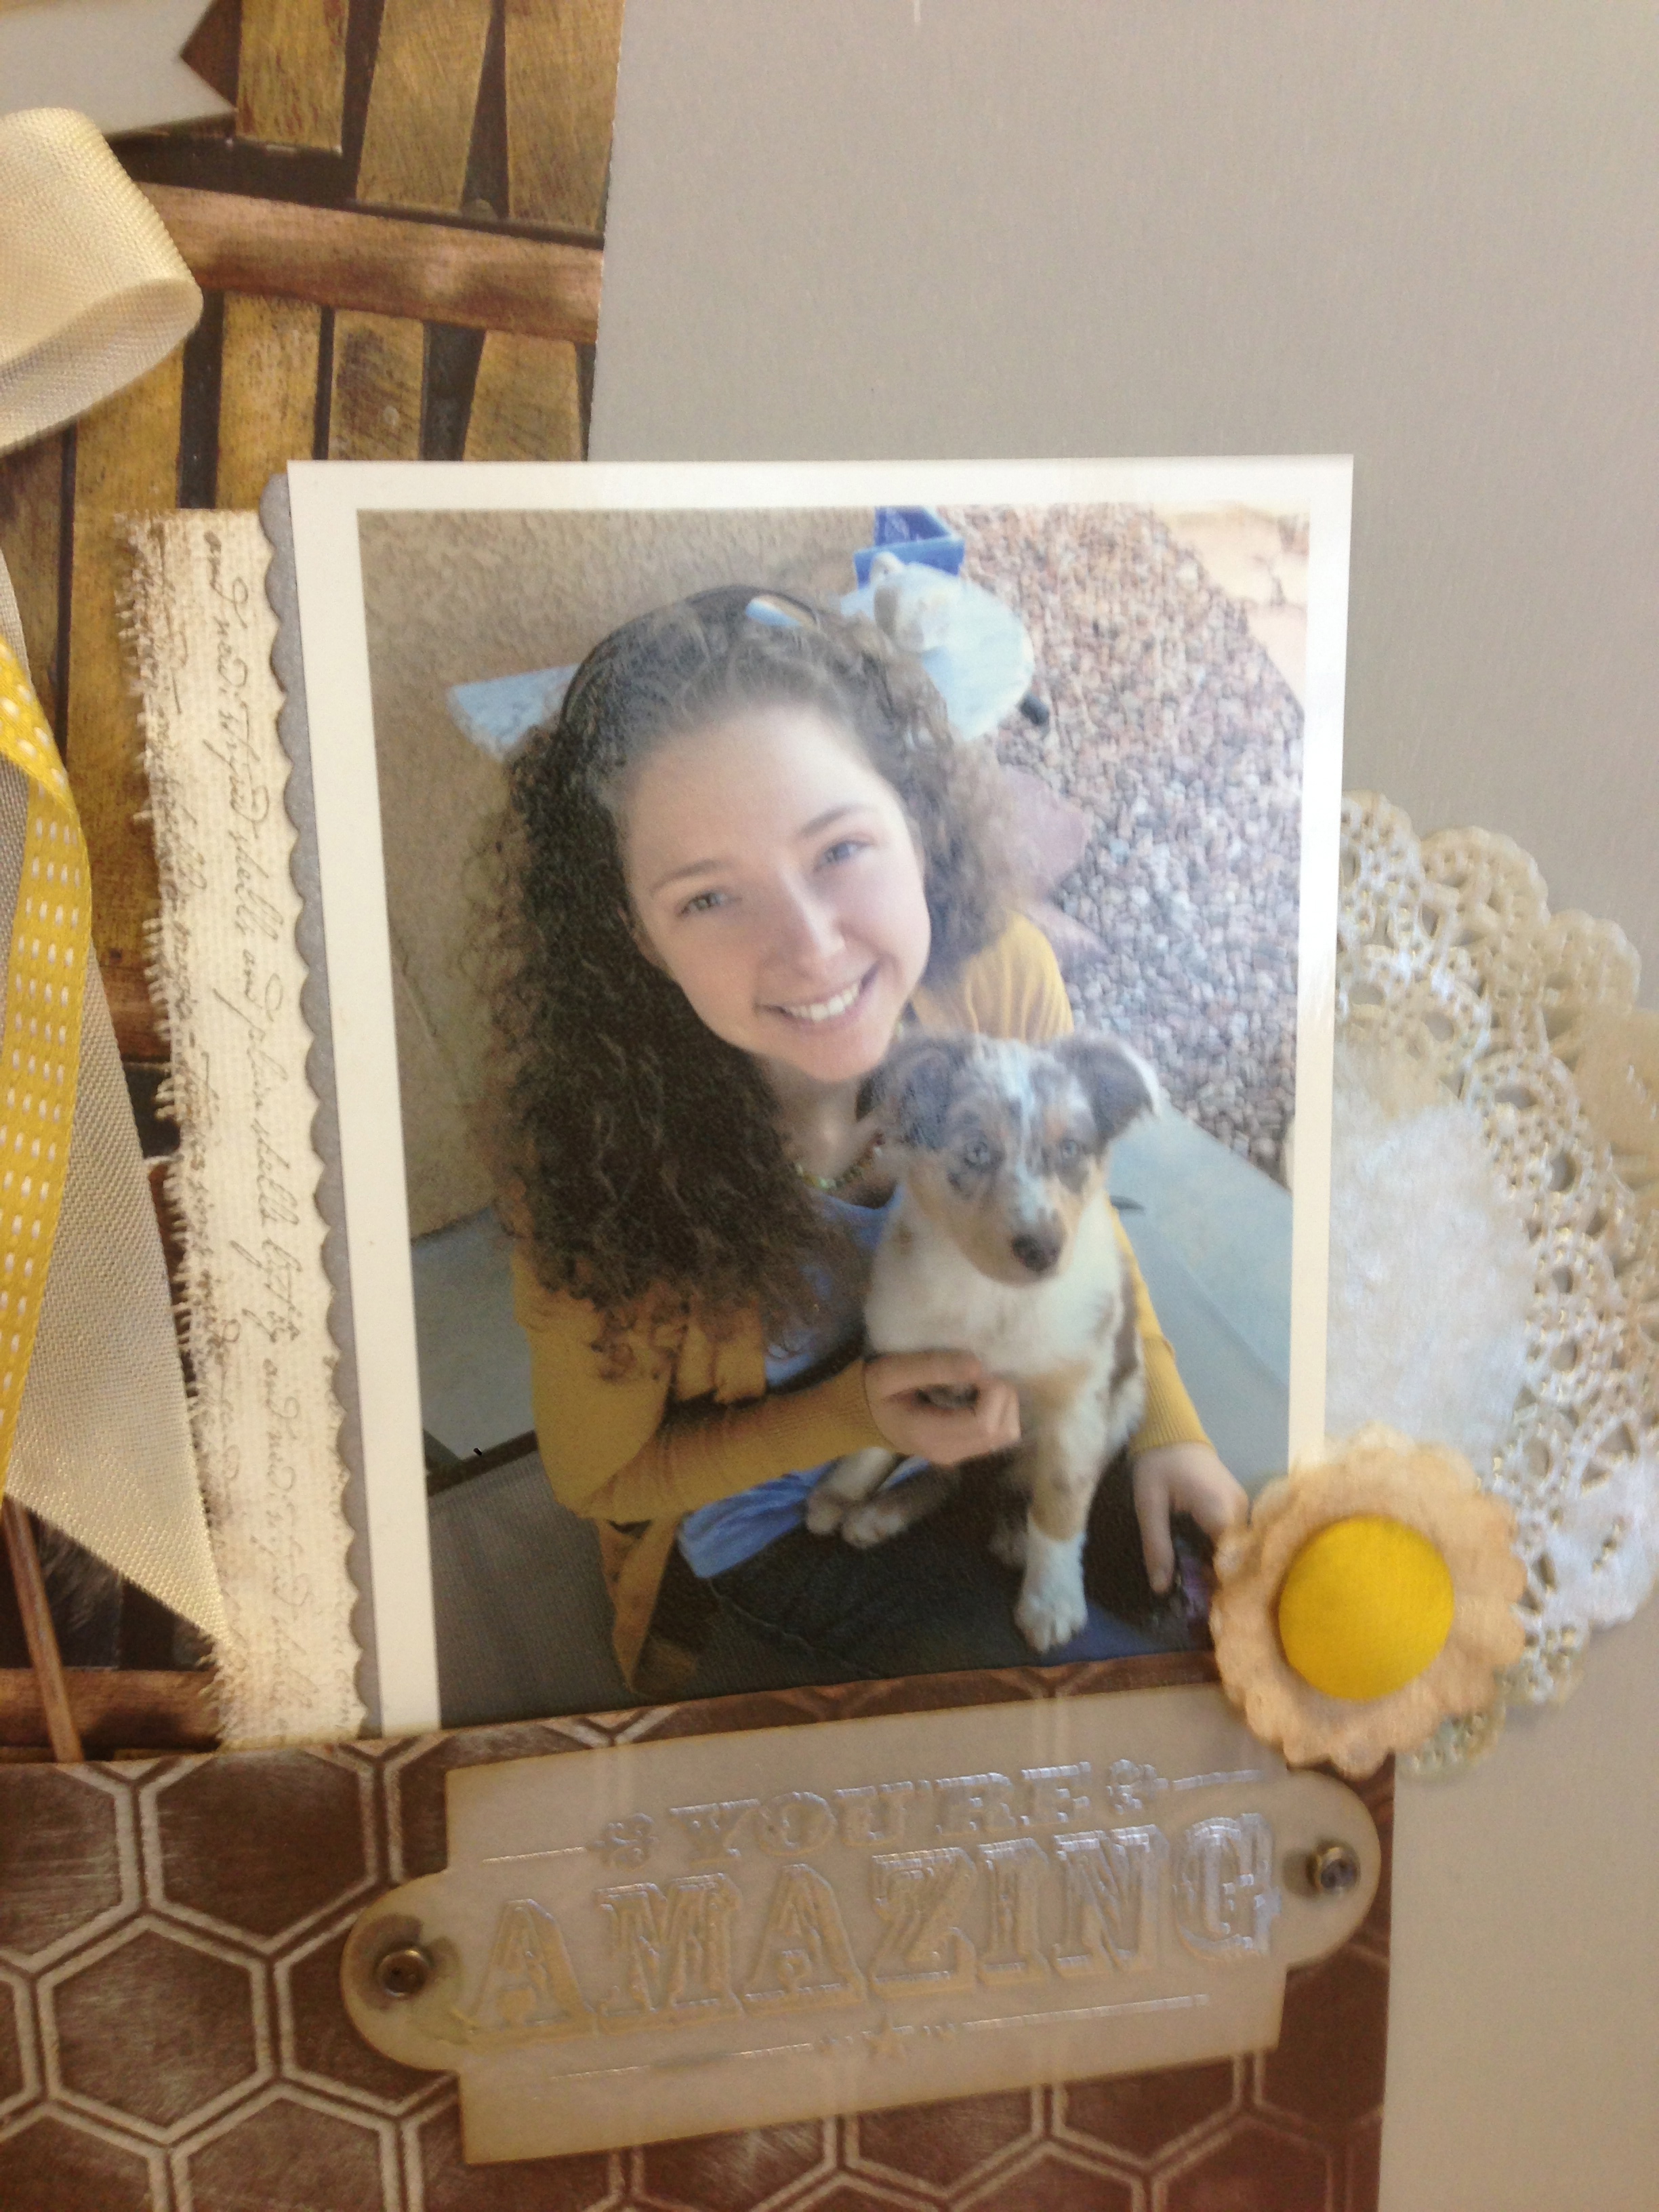
Today I am sharing one of the scrapbook pages I submitted for the Artisan Design Team contest.  I love, love, love this page!  I love the subjects….my daughter and her beautiful puppy Sawyer….and I love the products I used to create it!  This is an 8 1/2 x 11 scrapbook page and I used the new member of the neutrals family as my base:  Smoky Slate.  This color is soooo yummy!  I also used a couple of different patterns from Soho Subway Designer Series Paper; it was perfect for this project.  Some highlights on the page:  I made a “flag” with a wooden skewer and put three flags in Smoky Slate with words from the “Fabulous Phrases” stamp set.  I added some ribbon to the flag and slid it under the panel of Early Espresso Core’dinations Cardstock across the bottom.  I embossed the Early Espresso panel with the Honeycomb Embossing Folder and distressed it a bit by sanding it and then smearing some Whisper White Craft Ink over the high spots.  I included White Tea Paper Doilies again and again, I painted them with shimmer paint.  This time I used Frost White Shimmer Paint.  Have I mentioned how much I will miss this product????  (sigh)  I can’t seem to make any projects these days without using a doily or two!  And who would want to?  They are beautiful, add just the right final touch to nearly every project and they are sooooo affordable!  I embossed “You’re Amazing” from the “You’re Amazing” stamp set in Silver Embossing Powder onto White Vellum Cardstock and then used one of the framelits from the Apothecary Accents Framelits to cut it out.  I added the brads from Vintage Trinkets to finish off the piece.  I used one of the images from the “Mosaic Madness” stamp set to stamp some subtle highlights on the base cardstock in Whisper White Craft Ink.  I love how beautiful this is on the Smoky Slate, the image is delicate and soft at the same time.  It makes me swoon a little!  Lastly, I made a flower with the corduroy Summer Starfruit button and some punched cardstock.  I love that Summer Starfruit button and ribbon pick up the color of my daughter’s sweater!

Here are the products I used:

Stamps:  You’re Amazing, Mosaic Madness, Fabulous Phrases

Ink:  Early EspressoWhisper White Craft InkVersaMark

Cardstock:  Smoky Slate, Brushed Silver, White Vellum, Soho Subway DSP

Embellishments:  Summer Starfruit Corduroy Button, Frost White Shimmer Paint, Summer Starfruit 3/8″ Stitched Satin Ribbon, Very Vanilla 1/2″ Seam Binding Ribbon, Vintage Trinkets, White Tea Lace Paper Doilies, Silver Embossing Powder

Tools:  Big Shot, Honeycomb Embossing Folder, Apothecary Accents Framelits

To purchase these products go to my online store!

Check here for upcoming events and classes!

Make sure you check out all the fabulous projects created by the finalists by going through the hop!  Select “back” to see Bree Renwick’s fabulous work and select “next” to get to Dani Dziama’s amazing projects!

2013artfinalistback2013artfinalistnext

2013 Artisan Finalists Blog Hop – Day 1

2013artisanfinalistA

Welcome to the 2013 Artisan Design Team Finalists Blog Hop!  We will be sharing all the projects that we submitted to Stampin’ Up for the contest over the next ten days.  I can’t wait to share all the projects I poured my heart into for this!  This is an AH-mazingly talented group of ladies and I know you will be inspired by all the gorgeous projects!  You can choose the “next” and “back” buttons below to get to each designer’s post each day.

First off, I have to say that I was humbled and overjoyed to find myself in the company of all these creative souls!  What an honor to make the Top 20 in this contest!  I will be following all of the 2013 Artisan Design Team’s posts this year, I can’t wait to see what they come up with!  I feel especially lucky to have become friends with these girls during the weeks prior to convention when we found ourselves as part of the Top 20!  We still chat as we have time and I have truly won some wonderful new crafty friends 🙂

IMG_4162

The first project I am sharing is a card featuring some of my favorite products old and new.  I was so sad to see the Shimmer Paint retire in May!  I just loved that stuff and used it in many ways!  On this card, I “painted” full strength Champagne Mist Shimmer Paint on my White Tea Lace Paper Doily and on at least one of my banners…yummy!  My button is made with the White Simply Pressed Clay dyed with Calypso Coral Re-Inker.  I sponged the dry button with Soft Suede Ink to give it that vintage look.  I used the Canvas Creations for the label shape, I cut it out with a framelit from the Labels Collection.  Then I stamped it with the Ship’s Log image from “The Open Sea” stamp set and sponged the edges with Soft Suede.  Thank goodness that stamp set is still around, I find myself reaching for it often!

Here are the products I used:

Stamps:  The Open Sea, Loving Thoughts

Ink:  Soft Suede, Baked Brown Sugar, VersaMark

Cardstock:  Smoky Slate, Brushed Gold, Epic Day This and That DSP

Embellishments:  Canvas Creations, Champagne Mist Shimmer Paint, Simply Pressed Clay, Calypso Coral Baker’s Twine, Rhinestone Basic Jewels, White Tea Lace Paper Doilies, Gold Embossing Powder

Tools:  Big Shot, Honeycomb Embossing Folder, Labels Collection Framelits, Buttons & Blossoms Simply Pressed Clay Molds

To purchase these products go to my online store!

Check here for upcoming events and classes!

Make sure you check out all the fabulous projects created by the finalists by going through the hop!  Select “back” to see Bree Renwick’s fabulous work and select “next” to get to Dani Dziama’s amazing projects!

2013artfinalistback2013artfinalistnext

the “Northern Lights”….

I thought it was fitting to share this card today since I vacationed in Alaska this summer, the land of the aurora borealis or northern lights!  I haven’t seen the real northern lights but I think this card definitely gives an impression of this phenomenon and features my new favorite deer head stamp set!  Funny how that stamp has captured my heart…

This technique looks fancy shmancy but it is actually very simple to do.  You can Google the northern lights stamping technique and there are several YouTube videos on how to do it so I am not going to detail the technique here, just the colors and products I used.  I do have two tips.  I got the deer to be so nice and crisp by re-inking my pad right before we stamped him.  And if you get a smudge of the black from the stamp edge or clumsy stamping (me!!!), you can use your finger to smudge the ink into the background.  You have to do it right away before the ink dries completely but you won’t see your mistake at all!

There are a couple of things I love about this card.  The technique comes out slightly differently every time you do it…fun!  I am not a big fan of making the same thing over and over again…this becomes a problem for me every time I do swap cards, at some point in the process my ADD kicks in and I can barely stand to finish making them!  I also love that it can be used to give to a man, rarely do we make cards that a man would like to receive.  This is the perfect card for that guy in your life that needs a card from you for something!  The last thing I love is that it is quick and easy to make and the result looks like it was “hard”.  We made these in my stamp club last week and everyone’s came out a little bit differently and all were beautiful!

photo

Stamps:  Remembering Christmas

Ink:  Summer Starfruit, Coastal Cabana, Gumball Green, Raspberry Ripple, Midnight Muse, Basic Black

Cardstock:  Whisper White, Midnight Muse, Early Espresso

Embellishments:  1-1/4″ Burlap Ribbon, Linen Thread, Naturals Designer Buttons

Do something creative every day!

To purchase these products go to my online store!

Check here for upcoming events and classes!

Busy summer days!

Wowsers this summer is flying by!  Between work, travel and projects I have been a very busy girl!  I feel very blessed that I got to travel to Alaska again, an epic two week visit with family!  That was amazing!  If you ever get the chance to go to Alaska, I can’t recommend it enough.  The beauty everywhere takes your breath away!  And during the summer it is light most of the time which makes for a very interesting sleeping pattern!  Next up was Salt Lake City for the Stampin’ Up Convention!  Before all of that, Arizona to help my son and his girlfriend move home from college!  Sheesh!   I’ve been logging some miles!  In between I have been super busy at work at AAA and we also had a little fire nearby (Colorado Black Forest Fire) in June and I moved my stamp room from the basement to the second floor!  It’s making me tired just reading all of this!

I received some very exciting news while I was in Alaska, I got a call from Stampin’ Up and was notified that I had been selected as one of the Top 20 Finalists for the 2013 Artisan Design Team!  What an honor!  I spent the next three weeks until Awards Night at convention with my stomach in a knot worrying about whether or not I made the team (top 10).  In the end I didn’t but I still feel like I was a big winner just making the top 20!  I made 19 new awesome friends too!  All of the finalists connected on Facebook before convention and shared our fears and amazement at being selected!  It was a crazy ride all the way around!  Don’t miss our Finalist’s Blog Hop starting on Saturday, August 10th.  We are featuring all the projects we submitted to Stampin’ Up for the contest.  I promise amazing inspiration and beautiful work!

Convention was the absolute best!  I just love hanging out with my besties from near and far and catching up.  We had a wonderful time laughing, crying, shopping, talking and just being together.  I will share some pics and some gorge swaps from convention over the coming weeks.

Today I want to share a couple of projects that I made for a friend’s wedding.  We set up a joint pinboard on Pinterest and several of us pinned numerous ideas for decorations, favors, etc.  One thing I knew I wanted to make for her was a card “box” out of a vintage suitcase similar to one that I saw on Pinterest.  She also wanted a “brooch bouquet”.  If you haven’t seen those, just Google brooch bouquet, they are so pretty!  She got a couple of brooches from her grandmother and then bought the rest from the Goodwill.  I found a small vintage “suitcase” in Arizona at an antique shop for $6!

Here are the finished projects:

IMG_6614

Finished brooch bouquet!

IMG_6615

Close up of some of the brooches, her grandmother’s are clustered together.

IMG_6674

The bride with her gorgeous bouquet!  Stunning!  the bride and her bouquet!

IMG_6616

Nearly finished card box.  This is the only picture I have of this project right now!  I added a piece of retired “First Edition” DSP to the inside of the lid after I took this picture and that completed the project 🙂  I am going to get some more pictures of this beauty and will share another day.  It was about 4 am when I took this and I just had to go to bed!!!  Look at my giant crafting mess all around the finished suitcase.  I was a busy, busy girl that night!  The banner says “CARDS” and is made with burlap banner pieces.  I used the Big Shot to cut out the letters in Brushed Gold paper.  Each banner piece is embellished a little bit differently with antique lace, flower trim, buttons and ribbon.  I lined the inside of the suitcase with satin fabric that is a vintage-y cream color.  I added some tulle and burlap to the handle to finish the look.

I hope you enjoyed these projects!  I certainly enjoyed every minute of putting them together from being inspired by Pinterest projects to finding the materials needed to the final result 🙂

My bestie Debbie Keane and I are both trying to be more consistent bloggers so we are challenging each other to blog regularly.  Check out her blog at http://www.pungostamper.blogspot.com.  She has some amazing projects for you to drool over!  We are hoping that if we keep each other accountable we will do a better job posting!

Do something you love to do today!

To purchase some of these products go to my online store!

Check here for upcoming events and classes!

Time to bid farewell to some favorites!

MainAd_RetiredList_DBWS_4.24.13_NA

Today is the day that the retiring product list is released!  It’s time to say goodbye to some favorite colors, stamps & embellishments.  As traumatic as this is every year it is also very exciting to say hello to new goodies!  I have seen the new catalog and I am super excited about the fabulous new products coming soon!

If you need re-inkers or more paper in a retiring color or a stamp set you have been thinking about that is going away….don’t delay!  The paper, embellishments and ink will go super fast and when its gone, its gone!  Some things are on sale and can even be picked up at a discount.  Nice!

See the detailed retiring list here.

Now for the eye candy.  This card features the Hearts a Flutter Stamp Set and Framelits Dies.  I also used Paper Doilies, 1-1/4″ Two Tone Ribbon in Pink Pirouette/Rose Red and Canvas Creations.  This card is light and airy and romantic.  Who wouldn’t love to receive this on a day they need a nice pick me up?  Enjoy!

IMG_3314

To purchase these products go to my online store!

Check here for upcoming events and classes!

Chalk Art Love <3 !

_MG_2254

_MG_2258

Hello friends, I am on my way back home today after a fabulous vacation in Virginia with my best friend.  We spent 10 days chatting, creating, venting, shopping, antiquing, stamping, laughing and creating some more!  The last couple of days another great friend and a new friend joined us and we went into creativity overdrive!  It’s been so inspiring and fabulous, my spirit and soul are full and I am going home with renewed creative energy.

We created 32 projects and dreamed up at least another 32 that we didn’t get to!  Our biggest undertaking is the chalkboard frame pictured above.  We both took Rhonna Farrer’s Chalk Art on-line workshop and have been inspired to learn to make our own chalk art for some time now.  We really needed a showcase for our chalk art efforts though!  We had a couple of ideas and spent 45 minutes walking down every aisle in Michaels and came home with the bones of the project pictured above.  Then we painted & sanded & distressed & sponged & added gold accents & glued this beauty together.  It needed some embellishment of course and we spent almost a day collaborating on the beautiful, airy banner and rosette for the top.  We used lots of Stampin’ Up paper, ribbon, buttons, etc. as well as some pieces cut from some antique sheet music.  I think the end result is breathtaking!

_MG_2255

Some of the products of featured are:

You’re Amazing Stamp Set, Established Elegance Stamp Set, This and That Epic Day DSP, Pool Party Seam Binding, Gold Embossing Powder, Brushed Gold Card Stock, Vintage Faceted Designer Buttons, Vintage Trinkets, Pool Party Bakers Twine, Linen Thread, Artisan Embellishments Kit, Natural 7/8″ Cotton Ribbon & Natural 7/16″ Trim Ribbon.  Phew!  Lotsa goodies on this!

Truly this project is over the top and an unusual undertaking, but oh so pretty and fun!  A once in a while, special vacation project….just for me!

I hope you love it as much as I do!

_MG_2256

To purchase these products go to my online store!

Check here for upcoming events and classes!

more Artisan Embellishments Kit inspiration!

Artisan Bonus - Blog

Good morning friends!  This is the bonus card I designed for the Artisan Class.  Again, using embellishments from the Artisan Embellishment Kit and Tea for Two Designer Series Paper.  I also used Vellum Card Stock, the Papillon Potpourri Stamp Set and the Bitty Butterfly Punch.  This card was quick, elegant and makes a nice thank you or Mother’s Day card.

I have been on vacation in Virginia at my bestie’s house and we have been creating up a storm!  Stay tuned for some seriously gorgeous inspiration!

To purchase these products go to my online store!

Check here for upcoming events and classes!

Artisan Embellishments Kit….swoon-a-liscious!

Artisan Box - Blog Pic

A few weeks ago I co-hosted a fun class based on the fantastic Artisan Embellishments Kit in the Stampin’ Up Spring Mini Catalog.  One of the projects I designed for the class is this beautiful box with three 3×3 cards/envies inside.

The box is made with the Fancy Favor Die out of Very Vanilla card stock.  I used one stamp set (Oh, Hello), two Designer Series Papers (Tea for Two & First Edition) and nearly every other element came from the Artisan Embellishments Kit!  I can’t seem to get enough of this beautiful kit, the ribbon & lace are luscious and the buttons….oh my!  and the flowers….well you get the idea!  Just makes me swoon!

Card 3 - Artisan - Blog

Card 1

Card 2 - Artisan - Blog

Card 2

Card 1 - Artisan - Blog

Card 3

The finished box and cards are a lovely gift for someone special (Mother’s Day is coming up soon!) or you can treat yourself with this little goody 🙂  The best part is that you will still have a lot of fun pieces left in your Artisan Embellishment Kit after making these projects to make more pretty things with!

I hope you are having a fantastic day and finding some time to make something pretty!

To purchase these products go to my online store!

Check here for upcoming events and classes!

New beginnings….

Cathy Casey, Stampin' Up

Welcome to my new blog!  I am kicking this off with a My Digital Studio layout I completed today of “my favorite things”.  I am not sure blogging is one of my favorite things as evidenced by my past efforts but I am sure that My Digital Studio is a huge favorite of mine!

I am in the middle of a 21-Day Challenge to make a change in my life.  I am committed to moving more & eating better & being more consistent in sharing inspiration and ideas with you!  Part of that challenge for me is to try this blogging thing again with a new and better blog platform.  So here goes!

This layout features many elements of the This and That Epic Day Kit  from Stampin’ Up.  I love this digital kit, it has so many cute and funky elements that are really fun to play with.  When I started building this page I actually started with the coffee picture and then I found the cute picture of my doggie Sofia.  That made me think of my favorites and the page just came together after that.  I added my wonderful kids and I used the global search function in My Digital Studio to find elements featuring “favorite” or “favorites”.   My style is very eclectic and I am drawn to taking things that might not seem to go together at first glance and changing the color or shape or opacity to build them into something whole and pretty.

Thank you for stopping by, I hope you found something beautiful to inspire your creativity today!

To purchase these products go to my online store!

Check here for upcoming events and classes!